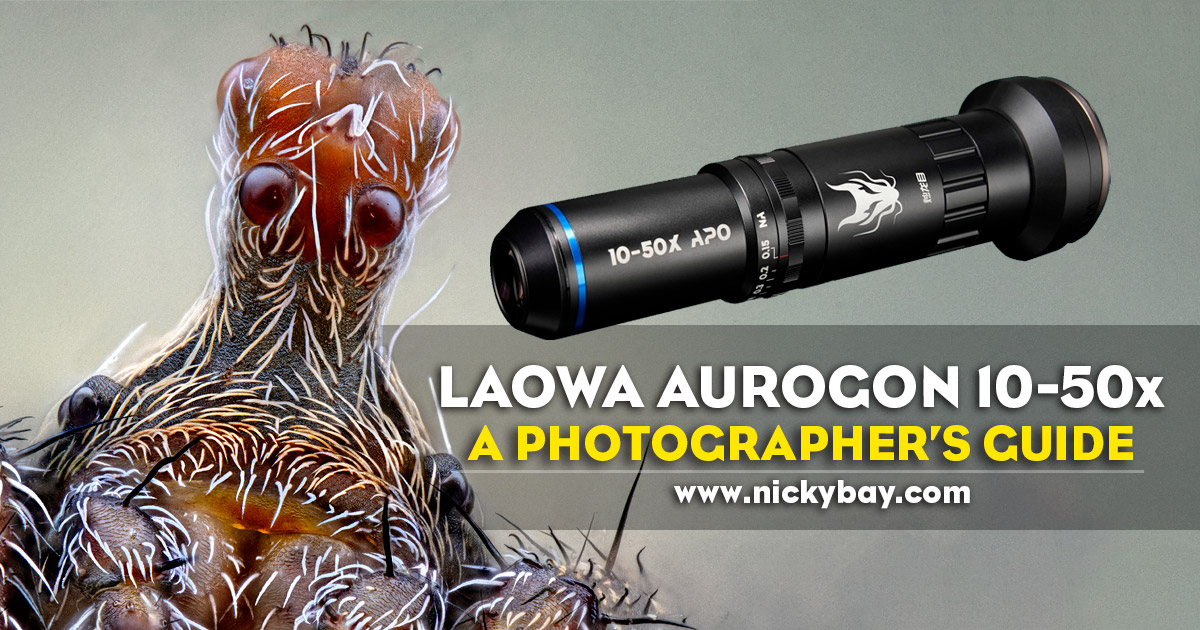
A Photographer’s Guide to Laowa Aurogon FF 10-50X NA0.5 Supermicro APO
The new Laowa Aurogon FF 10-50X NA0.5 Supermicro APO is a beast that produces great images at a fraction of the cost of high end microscope objectives. While the end results may look mind-blowing to those new to microscopy, many are still clueless to how they can start using the entire Laowa Aurogon set effectively. This is a basic tutorial or guide to a basic workflow for macro photographers who are seeking to start on high magnification microscope photography using the Laowa Aurogon.
Do note that there are MANY ways to use the Aurogon and this is just one of it and not necessarily the best nor most efficient set up. In most cases, the Aurogon is used on dead and preserved specimens. It is possible to use the 10x on live subjects in the field with a tripod and in very specific situations, even with the 20x. At 35x and 50x, the Aurogon should realistically be used only in a laboratory.
This is not a lens review. I do not have access to other comparable photo microscopy systems to review the optics and usability but I’m able to share my experience from using the Laowa Aurogon over a 3 month period. More importantly, I’ve documented the pitfalls that I’ve faced as a novice and how I overcame them.
Acknowledgements
Thanks to the folks at Laowa for loaning the pre-launch version of the Aurogon for testing. Special thanks also goes out to Paul Ng for helping to manage and position the spider specimens! Many thanks goes out to Paul DeZeeuw from Cognisys for answering many of my questions regarding Cognisys StackShot.
Inside the Box

The Laowa Aurogon comes packaged in a huge but sturdy case, containing the front objective lens, as well as the tube lenses for 10x, 20x, 35x and 50x respectively. Each tube lens comes with metal front screw on caps and standard plastic rear caps. The slip rings are sold separately, but I’d consider them to be essential to mounting the lens securely.
Equipment Used
- Nikon D850
- Godox TT350 x3 at about 1/16 power
- Meike MK-320 at 1/128 power as trigger
- Laowa Aurogon 10-50x + Slip Ring Set
- Cognisys Stackshot
- Vertical stand 2.0 with vertical and horizontal kit
Some useful accessories to consider:
- White printing paper for light diffusion
- Any LED light for focusing
- Blue tac to keep subject from shifting
- Featherweight entomology forceps to handle delicate subjects
- Big head pins to hold subjects in place
- AC power supply for flashes and camera, in case batteries go flat before a stack completes
Software Used
- Adobe Photoshop with Adobe Camera Raw
- Zerene Stacker
- FastStone Image Viewer (for Windows)
StackShot Settings
 Mode: Auto-Dist
This mode allows you to set the start and end positions of the stack, and configure the distance between each step or frame.- Interval: 5s
This is the pause in between each shot, which gives time for the vibrations to settle down and for the flashes to recycle. - Step Distance
The optimal step distance depends on the magnification of the lens. I personally use 10µm for 10x, 5µm for 20x, 2µm for 35x and 1µm for 50x. These step distances are an overkill but redundant shots are better than gaps in the stack should a flash fail to fire for whatever reason.  Backlash Compensation
To cater to expansion and contraction, all gears have little gaps in between each other rather than fitting perfectly. This results in small inaccuracies when setting the start and end positions when the gears change direction and have to turn to fill the gaps first before they engage. The backlash compensation setting should only need to be set once with a bit of trial and error, but I’d recommend to test and calibrate it before each session. Refer to Calibrating Backlash For Your StackShot Rail.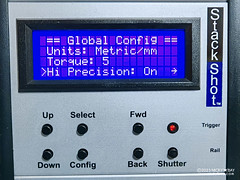 High Precision: On
This mode must be enabled for smoother steps in the stack for 30x or 50x. Why don’t we leave it on permanently then? You could, but it makes the StackShot controller produce a very audible sound all the time. Refer to this post with a chart to illustrate the difference.
Camera Settings
Do note that the following recommendations are based on the Nikon D850.
- Disable Auto Image Rotation
For vertical setups, disable Auto Image Rotation or the photos may be automatically rotated at random. - Save in RAW
Ensures that you save your shots at the highest quality. - ISO 200
A low ISO ensures minimal noise. ISO100 works as well but the difference is minimal. - Shutter 1/200s
Using flashes rather than continuous light eliminates failed shots due to any vibration, so we would use a high shutter speed here. - Live View
Always use LIVE VIEW when composing and setting up the shots.
Aurogon Lens Settings
The NA (Numerical Aperture) characterises the range of angles over which the system can accept light. The Aurogon has an NA range of 0.1 (brightest) to 0.5 (darkest). I’ve listed the NA settings that I used that yield acceptable results (from trial and error), with the corresponding DOF or step-distance that we should use.
Using the formula where DOF=λ/NA² (Zerene Systems: Determine DOF (step size) from Numerical Aperture (NA)) where λ would be the wavelength of visible light (400nm to 750nm), we will use the shortest wavelength of 400nm in our calculations to avoid focus gaps in our stacks. Practically, you can use double of the Step Distance in the table below with minimal impact to the results as there was a lot of buffer included in the calculations.
| Magnification | NA | DOF (λ/NA²) | Step Distance |
|---|---|---|---|
| 10x | 0.3 | 4.4µm | 4µm |
| 20x | 0.35 | 3.3µm | 3µm |
| 35x | 0.4 | 2.5µm | 2µm |
| 50x | 0.45 | 1.98µm | 1µm |
Stabilisation Techniques
- Minimise Vibration
At high magnifications, every tiny bit of vibration may appear like earthquakes on the viewfinder. Ensure that both the camera/lens and the subject are securely mounted. It may be ideal to have the subject on a separate working table altogether. - Manage Shot Intervals
Configure the shot intervals to allow time for the camera shake to settle down after each step movement. The interval must also cater to the flash’s recycle time. I usually set the interval at 5s.
Subject Position, Adjustment and Preparation
Getting subjects into a precise position is a challenging process. Some tools are available to help.
- XYZ Linear Translation Stages
I did not use this for my test shots, but I wished that I had something like it to save myself from a lot of frustration while positioning the subjects. Mounting the subject on an XYZ Stage allows precise positioning along 3 linear axes. - Focusing Rails
A cheaper option which I used is to mount the subject on a 2-axis focusing rail. Unfortunately cheaper models, precise adjustment will be rough and difficult. - Subjects Preserved in Alcohol
Some subjects are preserved in alcohol. To prepare them for photography, we can position the specimen on a layer of alcohol-based gel in a microscope cavity slide. Once positioned, pour ethanol over it to fill the cavity and cover with a microscope slide cover to ensure a perfectly flat surface. The subject may move a little after placing the cover, so this step requires some experience to minimise the movement.
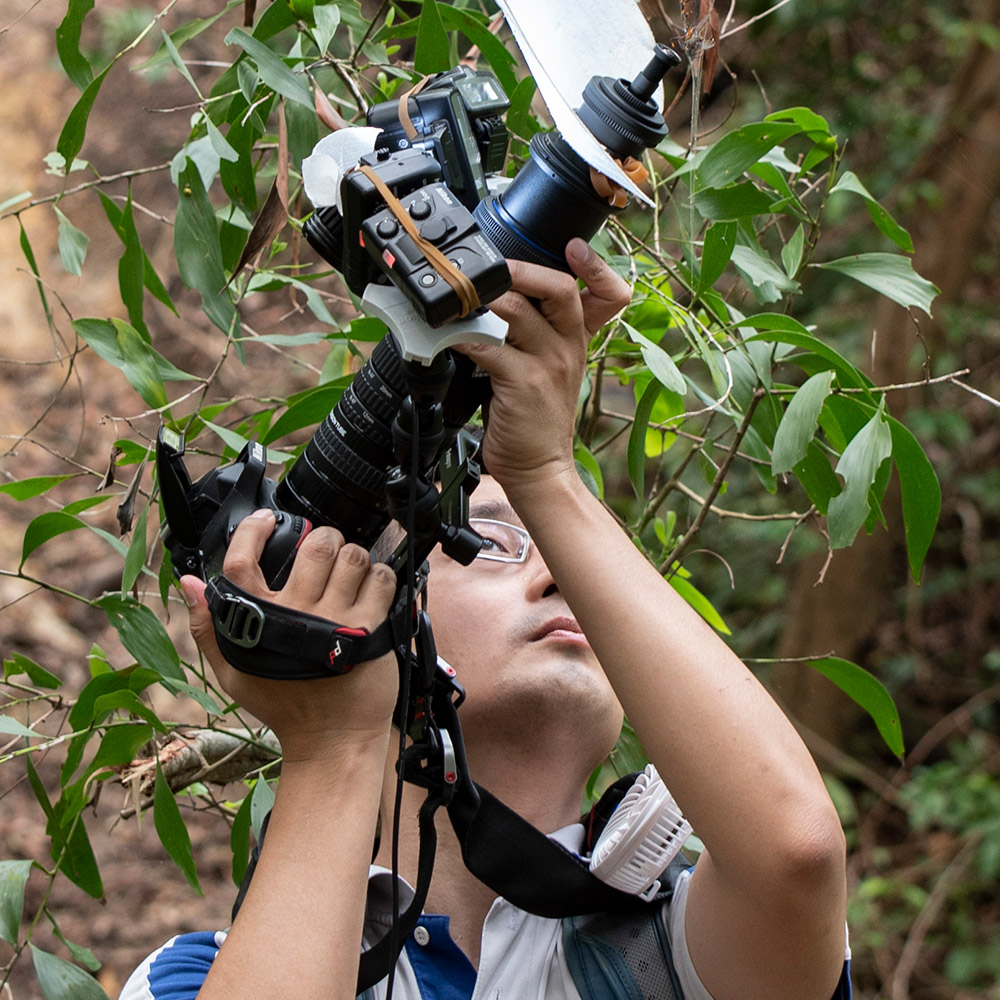
Lighting and Diffusion

One of the easiest ways to diffuse light on the subject is to use white printing paper. Most of my shots were taken with just a small piece of white printing paper wrapped around the lens. It does have decent diffusion, but the images may turn out to be quite boring and flat with light coming from all angles. Do experiment with light from different angles to create more depth in the shots.
Tips and Suggestions
- Choice of Subjects and Framing
Not every subject is suited for photo microscopy. Start by choosing subjects with no overlapping parts and with minimal depth range. Butterfly scales are ideal for the novice. After getting some successful shots and clearing any initial doubts, you may advance to more complex subjects. - Ghosting Effects
Ghosting is a common occurrence at edges with steep depth contrast and made worse with a high colour contrast. This can sometimes be minimised with slabbing, but I’d recommend to avoid it altogether for novices. - Hunting for Subjects
Sometimes the subject is so small that we’d have a very hard time looking for it (this will definitely happen to novices) at higher magnifications. One way to mitigate this is to draw or place reference marks close to the subject. - Exposure Management
As we deal with deep stacks consisting of MANY exposures, always ensure that the exposure is perfect before starting any stack sequence. Noise from under-exposed shots tend to be amplified after stacking. - Managing Sensor Dust
Be sure to clean your camera sensor prior to a stacking session. Having little to no dust spots will reduce the processing time by skipping the dust removal step. - Chromatic Aberration (CA) Removal
CA is common along high contrast edges. When they get too obvious, some simple steps in Photoshop can be used to reduce the effects of CA. I’ve detailed a simple process in Review of Venus Laowa 15mm Wide Angle 1:1 Macro Lens.
Aurogon vs Microscope Objectives
As explained at the start of the post, I have very limited experience in using microscope objectives, so I can only provide a limited comparison.
- 20mm Working Distance Even at 50x
Most microscope objectives tend to have short working distances. A typical Long-Working Distance 50x objective may have a working distance of 13mm, and a 20x objective would have a working distance of about 8mm. There are Ultra Long Working Distance versions of some objectives to get a comparable working distance, but those would cost much more. - Fixed Working Distance
The Aurogon has a fixed working distance of 20mm across all magnifications. This means that we can leave the front objective part of the lens on while we switch the base tube for a different magnification. It is still a cumbersome process to switch tubes, but it beats having to re-position the lens and search for the subject. - Price
The entire Aurogon set (10x, 20x, 35x, 50x) is priced at US$1500, which is a fraction of the cost of a single high-end 50x objective. If you already own the pricey objectives, the Aurogon won’t be a worthwhile investment for you. But for everyone else on a smaller budget but with a keen interest in microscope photography, the Laowa Aurogon is an excellent choice. Bear in mind that with any microscope photography setup, there are other equipment and software to purchase (see top of post).
Photo Journal with Laowa Aurogon
I’ve only managed to attempt shots on a few specimens. The initial shots were at 20x, while almost all subsequent attempts were at 50x as that was the most challenging magnification and I wanted to improve on that first.
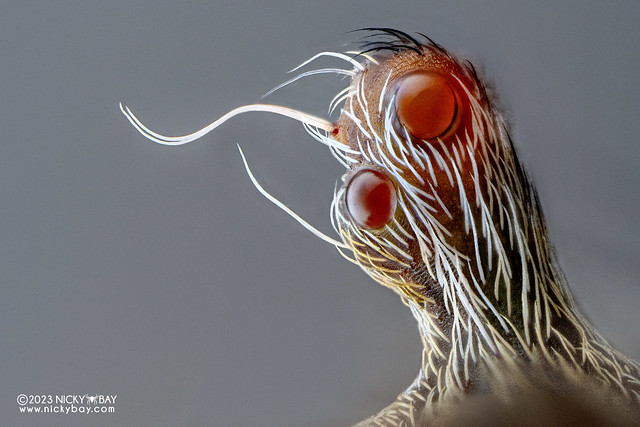
Periscope orb weaver (Eriovixia sp.)
The first subject that I tested the Aurogon on was the periscope orb weaver which I intercepted from the spider lab. The body width was about 4mm, while the eye stalk is less than 1mm thick. This species is nocturnal and wraps around branches in the day for lengthy periods, so it allowed me to attempt some deep stacks. It still does run around, which makes it really frustrating to re-position everything, but the results are worth it! For light diffusion, I just placed a single sheet of white printing covering about 180° around the spider.
Periscope orb weaver (Eriovixia sp.)
To get a better feel of the size, here’s a 2x shot on a m4/3 sensor, with the tip of my finger next to it. It is equivalent to 4x magnification on a full frame.
Periscope orb weaver (Eriovixia sp.)
The front view took 126 frames, here’s an animation showing the individual shots forming the entire stack.
Periscope orb weaver (Eriovixia sp.)
20x, 126 frames. The end result at 20x shows fascinating detail, especially the texture of the eye stalk in between the hairs.
Periscope orb weaver (Eriovixia sp.)
20x cropped, 76 frames. While the spider was still contentedly sitting still, I gently repositioned the stick to get a lateral close-up.
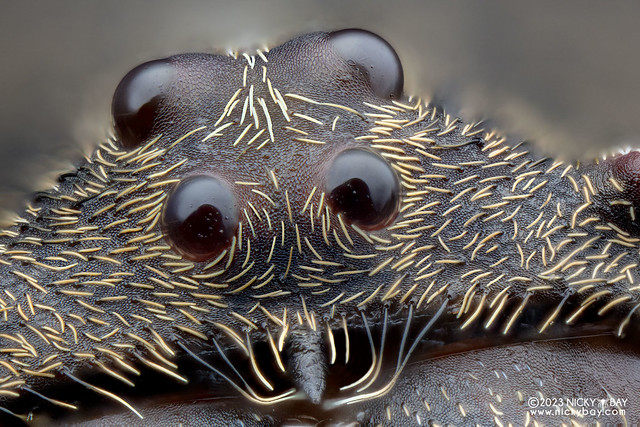
Wrap-around orb weaver (Talthybia sp.)
20x, 95 frames. The wrap-around orb weaver is another good candidate for stacks as it can stay still for long periods of time in the day. However, I’ve noticed that this species fidgets a lot. It won’t be visible from the naked eye but the micro movements would show up in the frames of a deep stack.
Spider Palp Photography
After some testing on live spiders, I brought the Aurogon to the spider lab to test some shots on preserved spiders and pedipalps.
Spider Palp Size
To get a better idea on the subjects that we were working with, here’s a shot of a spider palp on a microscope cavity slide.
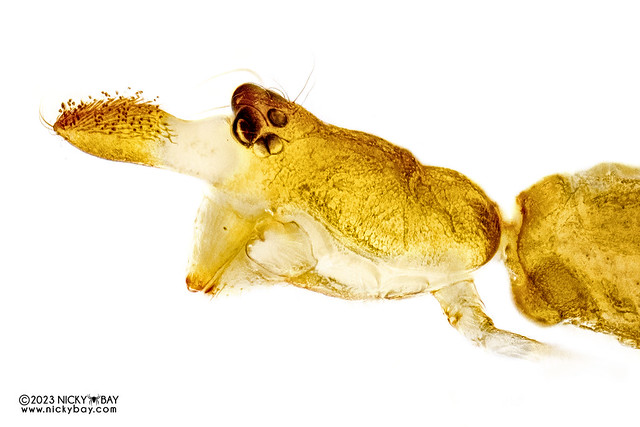
Orb weaver palp (Singa sp.)
20x, 103 frames. The palp was resting on alcohol-based gel and submerged in alcohol. The result was not very ideal as we forgot to use a microscope slide cover. This meant that the water level might not be perfectly flat, which can result in refraction in the image. The imperfections would become more obvious at a higher magnification like 50x.
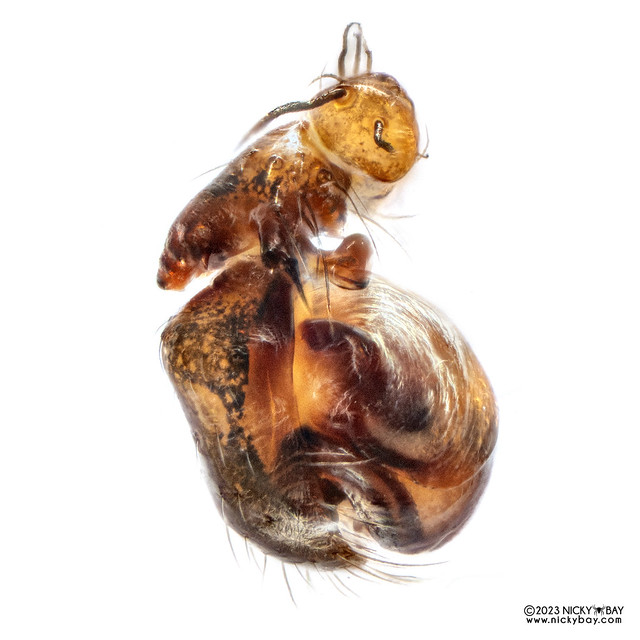
Minute leaf litter spider (Mosu sp.)
20x, 31 frames. I tried shots on smaller palps and it proved to be much more challenging as the camera’s movement caused the subjects to shift a little at times.
Gobling spider (Xyphinus hystrix)
20x, 62 frames. I tried zooming in to parts of spiders as well, and found that after a few rounds of photography, the alcohol got a little contaminated and it affected the photos.
Comb-footed spider (Faiditus sp.)
20x, 45 frames. Sometimes, it was useful to zoom into specific parts of a spider showing diagnostic traits.
Dwarf orb weaver (Anapidae)
20x, 78 frames. Some spiders were simply too small. Even at 20x, I had to do a bit of cropping to get this shot. Overall, the attempts on subjects submerged in alcohol were not very ideal due to the lack of a microscope slide cover to force the water level to be perfectly flat. We’ll have to make another attempt in the future!
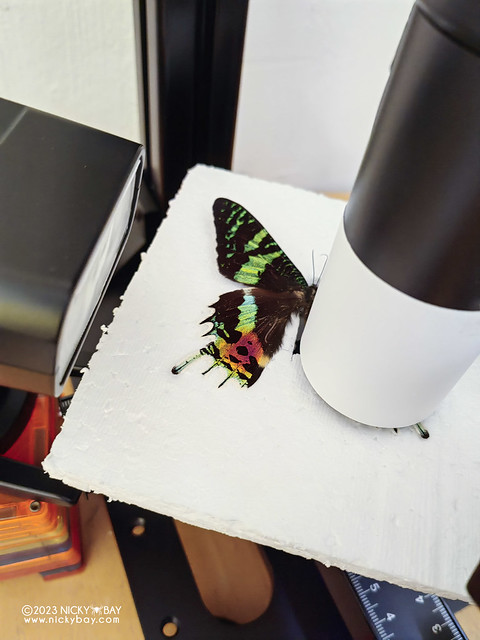
Mounting butterfly specimens
Subsequently, I managed to loan some butterfly specimens to get more shots at 50x. The specimens were placed on a sheet of styrofoam with a cutout for the butterfly’s body to slot in. Some pins were also used to hold the specimen in place as shown in the picture. Note that using the pins in this manner may damage the specimens if not done carefully.
Photographing butterfly/moth at 50x
The styrofoam sheets were then secured to my focusing rail with blu-tack.
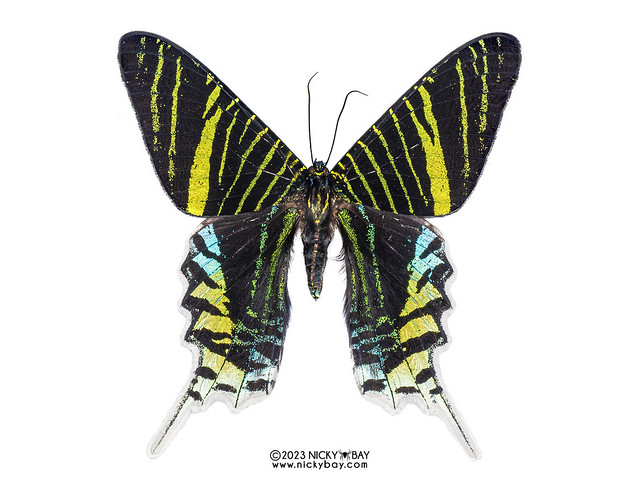
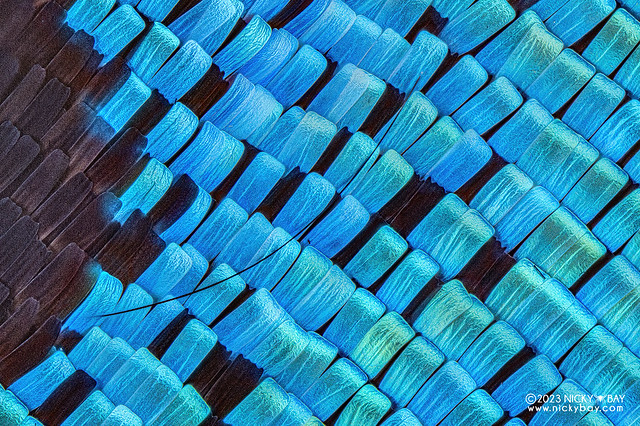
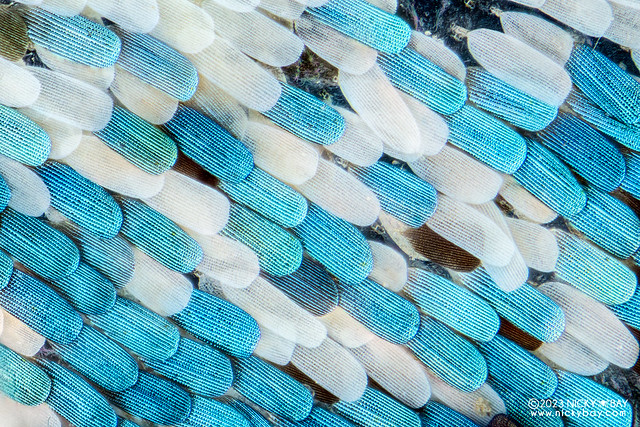
Green Banded Urania (Urania leilus)
I started off with the Green Banded Urania.
Green Banded Urania (Urania leilus)
20x, 62 frames. The specimen has beautiful metallic scales which appear blue or green when viewed from certain angles.
Green Banded Urania (Urania leilus)
50x, 131 frames. I like to look for spots where the colours cross over to show a mix of different scales.
Green Banded Urania (Urania leilus)
50x, 56 frames. This moth was fringed by white scales, so I tried zooming into the white portions as well.
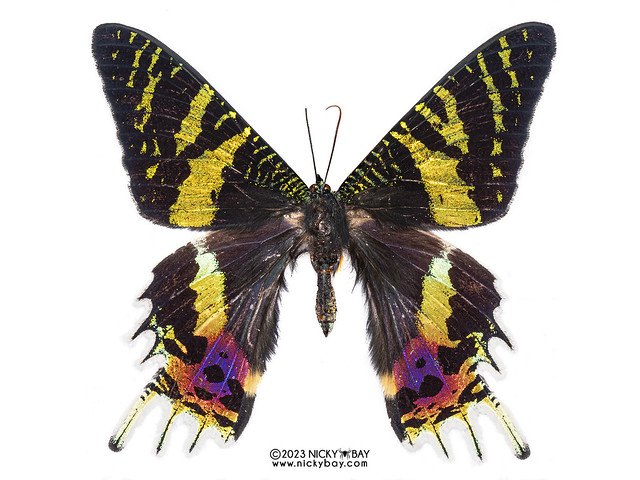
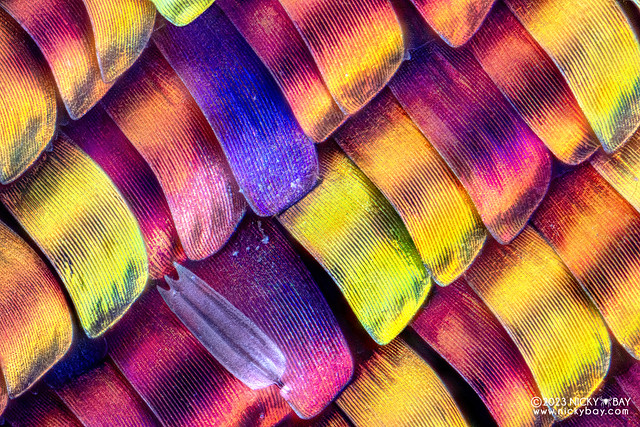
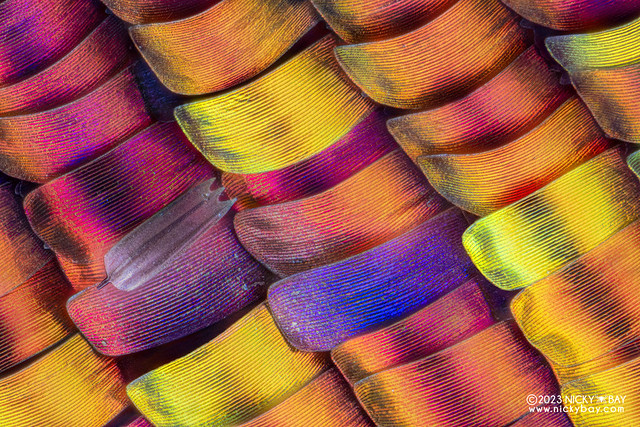
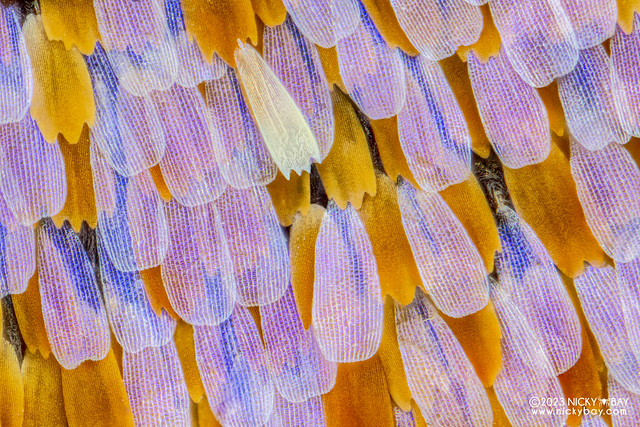
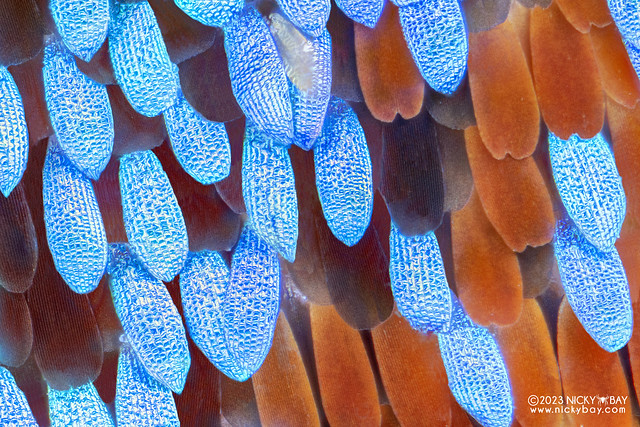
Madagascan Sunset Moth (Chrysiridia rhipheus)
The next subject has got to be one of the most colourful moths that I’ve ever seen. Hopeful to see them in the wild in the future!
Madagascan Sunset Moth (Chrysiridia rhipheus)
20x, 53 frames. Explosion of colours where the different colours meet.
Madagascan Sunset Moth (Chrysiridia rhipheus)
20x, 38 frames. The portions that appeared white with direct light turned out metallic blue in the shots.
Madagascan Sunset Moth (Chrysiridia rhipheus)
50x, 158 frames. Nice results, but the source frames still had problems. Later on, I found out that I had to switch on Hi Precision mode for the steps to be smoother. This is required for high magnification stacks such as 50x.
Madagascan Sunset Moth (Chrysiridia rhipheus)
50x, 206 frames. This was one of the better stacks, with most of the settings tweaked.
Madagascan Sunset Moth (Chrysiridia rhipheus)
50x, 107 frames. Purple scales.
Madagascan Sunset Moth (Chrysiridia rhipheus)
50x, 72 frames. Golden scales with a single black scale.
Madagascan Sunset Moth (Chrysiridia rhipheus)
50x, 90 frames. One of my favourite shots with gold and black scales.
Madagascan Sunset Moth (Chrysiridia rhipheus)
50x, 202 frames. Cropped shot of the silvery scales.
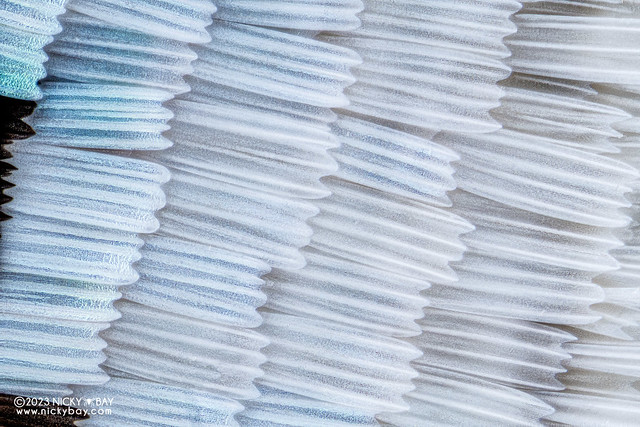
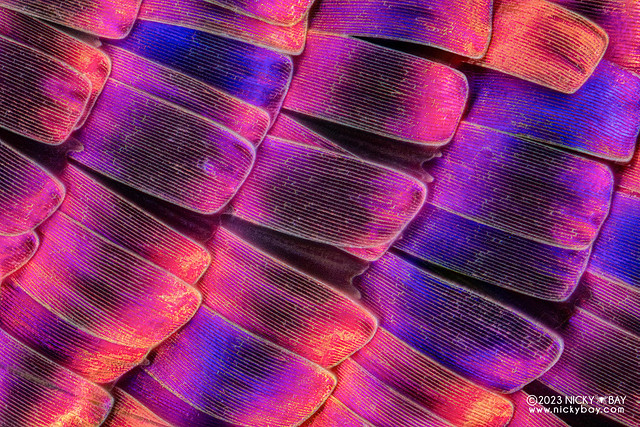
Peacock Butterfly (Aglais io)
Next, I had a worn out specimen of a peacock butterfly. The scales were damaged so I selected very specific areas to stack.
Peacock Butterfly (Aglais io)
50x, 121 frames. This specimen had nice translucent scales!
Peacock Butterfly (Aglais io)
50x, 110 frames. I tried to capture the area where the orange scales start, but there wasn’t much contrast.
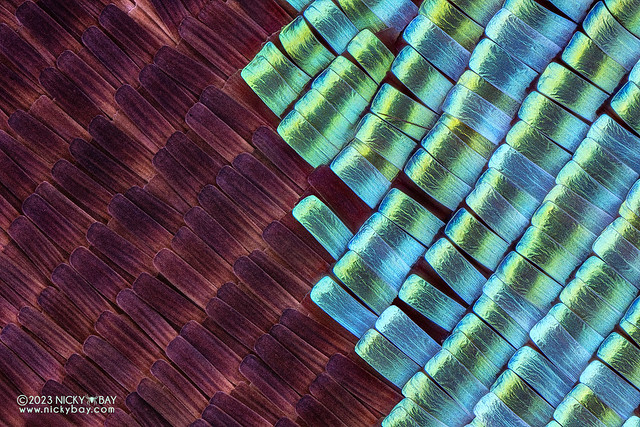
Huaqing Brocade Moth (Erasmia pulchera chinensis)
Next specimen is a Huaqing Brocade Moth. Unfortunately the scales were also damaged in many parts of the wings.
Huaqing Brocade Moth (Erasmia pulchera chinensis)
50x, 194 frames. The specimen is really beautiful, unfortunately there were limited areas with relatively undamaged wings.
Huaqing Brocade Moth (Erasmia pulchera chinensis)
50x, 153 frames. Adding white scales to the mix brightens up the composition.
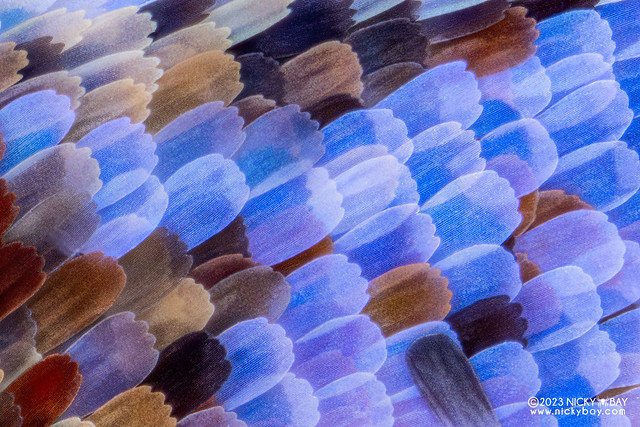
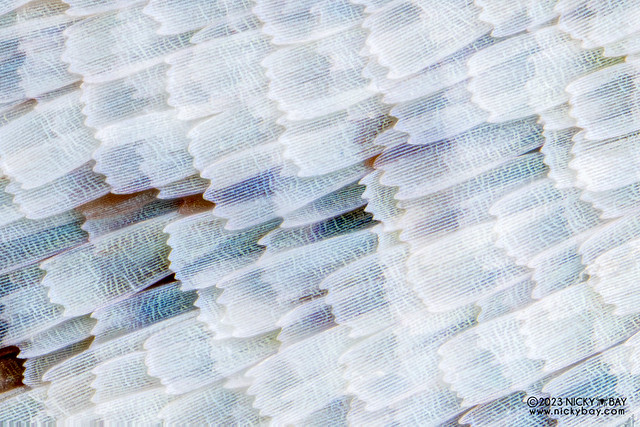
Unidentified butterfly wing
50x, 80 frames. I also managed to get some unidentified specimens with only the wings. They were not in pristine condition but I managed to document some variety of scales.
Unidentified butterfly wing
50x, 75 frames. Experimenting with all white scales.
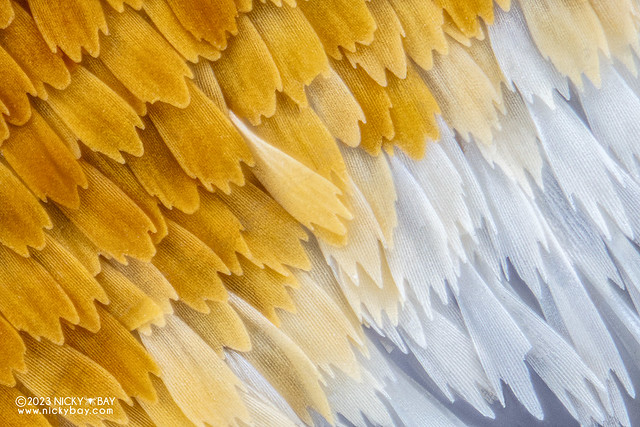
Unidentified butterfly wing
50x, 77 frames. Orange scales complemented the white scales very nicely.
Unidentified butterfly wing
50x, 196 frames. Orange scales with white edges were quite nice too.
Unidentified butterfly wing
50x, 118 frames. There were many shots taken with orange and blue scales together, but I found that these shots were very difficult to stack due to the high-contrast edges. The out of focus colours always affected the neighbouring in-focus colours. If you have a solution to this, please do share it with me. 🙂
Green Metalwing (Neurobasis chinensis)
Finally, I also managed to access a damselfly wing specimen.
Green Metalwing (Neurobasis chinensis)
This was shot at 2x on a m4/3 body (equivalent to 4x on full frame).
Green Metalwing (Neurobasis chinensis)
Close up on the wing veins revealed some bubble formations.
Green Metalwing (Neurobasis chinensis)
The colours on the pictures look different from the shot from a normal macro lens due to the structural colours on the wings. The colours will appear different when the angle of light changes.


Technical Specifications
| Magnification | 10x | 20x | 35x | 50x |
|---|---|---|---|---|
| Adjustable numerical aperture (NA) | 0.1 – 0.5 | |||
| Working distance | 20mm | |||
| Maximum objective diameter | 50mm | |||
| Length of objective lens | 167mm | |||
| Weight of objective lens | 390g | |||
| Aperture blades | 9 | |||
| Wavelength range | 435nm – 656nm | |||
| Objective lens+tube lens focal length | 18.8mm | 10.3mm | 6.85mm | 5.56mm |
| Maximum diameter of tube lens | 70mm | |||
| Length of tube lens (exclude cover) | 112mm | 163mm | 210mm | 253mm |
| Weight of tube lens | 377g | 444g | 530g | 609g |
| Maximum distortion | 0.60% | 0.80% | 0.40% | 0.40% |
| Conjugate distance | 299.4mm | 370mm | 420.2mm | 465.1mm |
| Mount | PL / EF / F / E / RF / Z / L / GFX | |||
Conclusion
Attempting microscope photography with the Laowa Aurogon was really enjoyable. It is value-for-money and a great choice for those starting out on microscope photography, which is typically cost-prohibitive and comes with a steep learning curve. This would be a different genre from typical macro photography, so expect to learn everything from scratch. The pointers above would help a bit, but a lot more time is definitely needed to plan, execute, troubleshoot, and process each shot.
If you already own a nice set of high-end microscope objectives, the Aurogon won’t be a worthwhile investment for you. But for everyone else on a smaller budget but with a keen interest in microscope photography, the Laowa Aurogon is an excellent choice.
Although I would always prefer being out in the field than taking photos in the lab, I foresee myself using the Laowa Aurogon again to overcome other challenges in documenting microscopic organisms such as tardigrades.
The Laowa Aurogon FF 10-50X NA0.5 Supermicro APO was launched in September 2023 at US$1500, with an additional US$50 for a pair of slip rings, which I feel are absolutely essential and should have been included in the package. If you would like to support the production of more content on this site, you may purchase it via MacroDojo. Otherwise, you can also purchase it directly from Venus Lens. The price and fulfilment source is exactly the same. Thank you. 🙂