Macro Equipment
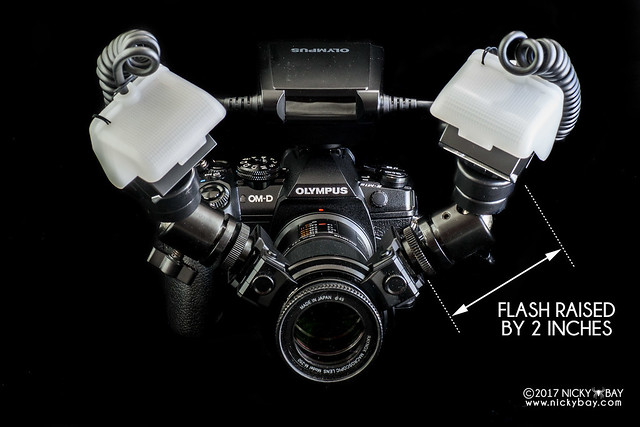
Current Macro Setup
I am shooting handheld 99% of the time now, switching to the 200mm on tripod only once in a long while for very specific subjects in the day. Shooting handheld allows me to keep more than 3 times as many shots as I would normally have if I had shot on a tripod, so the choice was obvious. As there is no perfect macro setup, I change my flash setup every now and then. What works for me may not work for you — everyone is encouraged to use this as a reference, but please be aware that results will vary.
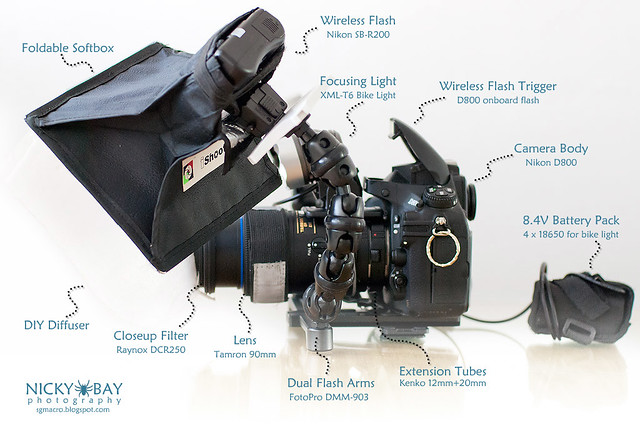
Here’s a photo of my old DSLR setup. It produces a higher level of detail (full frame) but requires a good control of the focusing and demands better precision to get the shots. I use an entry-level micro four-thirds camera now, compromising on image details for convenience.
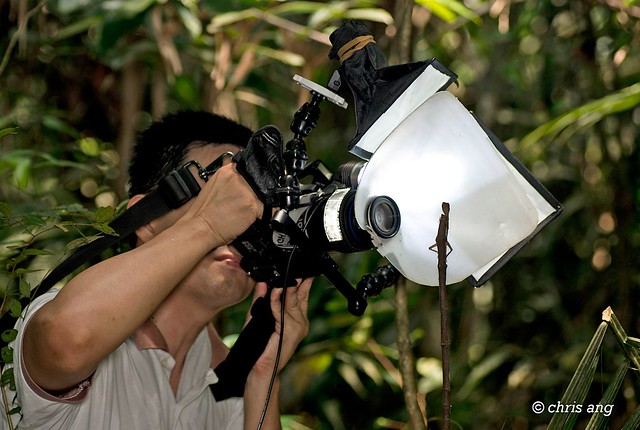
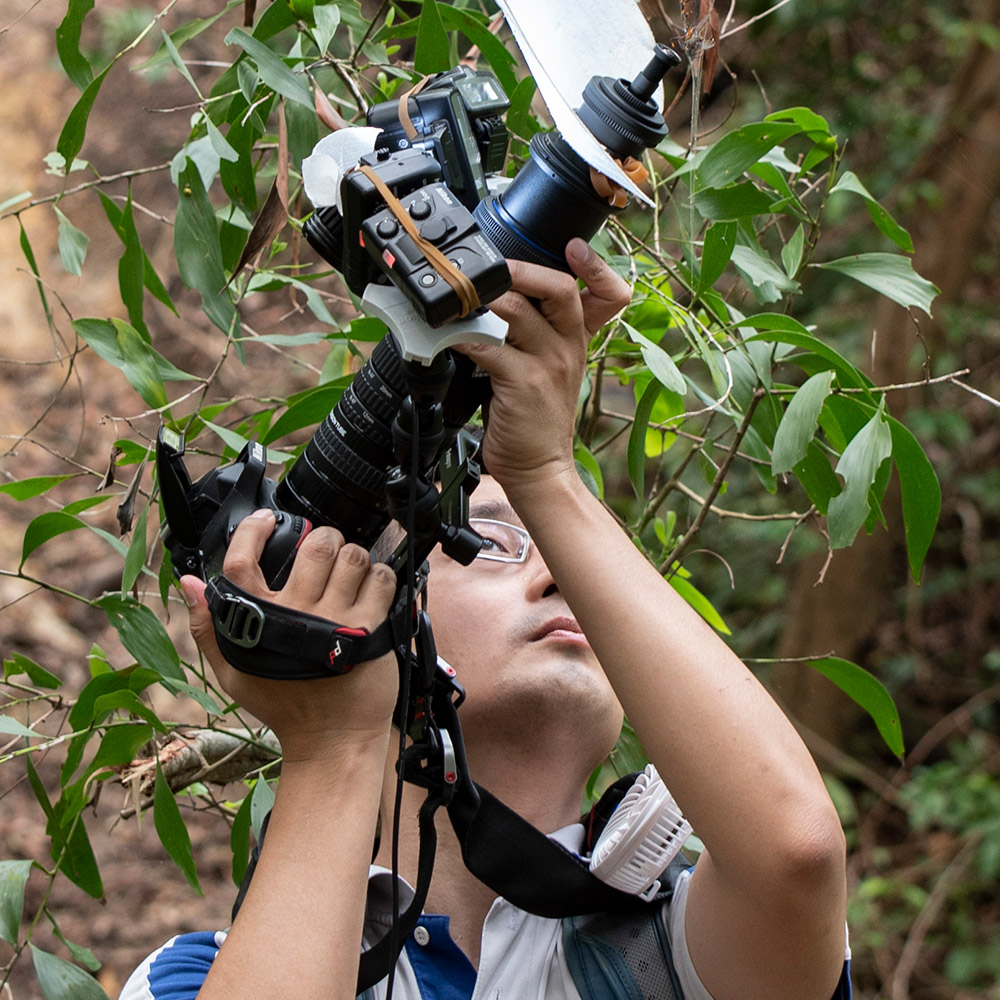
Here’s a photo of me using one of my setups, courtesy of Chris Ang.
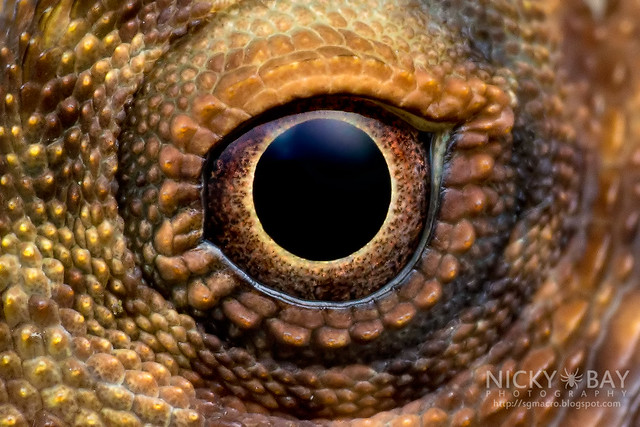
100% cropped result from the above scene
Are Expensive Gears Better?
Some gears are expensive because of certain features. But bear in mind that those features may or may not be beneficial to you.
Many photographers cringe at getting comments like this…
“You must be using a very expensive camera! What camera and lens are you using?”
If that comment sounds normal to you, please consider these comments as well.
“The dinner was awesome! Your pot must be really good!”
“The novel was mind-blowing! What brand of typewriter are you using?”
“The graphic design is beautiful! Which software did you use?”
“Your golf game was fantastic! You must be using expensive clubs!”
“You look really well toned! You must be going to a very expensive gym!”
The list goes on, but the main take-away is that there are too many factors involved in a good photo and the camera and lens are just two of the many contributing factors.
You don’t need expensive cameras and lenses to take good macro photos. Each piece of equipment has its pros and cons and the most expensive lens in any particular range may not be the most ideal. In fact, they are usually heavier or bulkier, and often come with features that you may or may not need. What works for an individual may not work at all for another. My personal favorite lens happens to be the cheapest and I could tell others than my current camera setup cost me less than half of their latest iPhone. Remember, there is no perfect macro setup!
Ideal Settings for Macro – why is EXIF absent in my photos?
I am often asked on the settings I used for macro shots, or to post EXIF for my photos. There is again, no good answer to this and I usually try to abstain from answering as it will mislead others to think that whatever setting I used in the EXIF is good for them. F-stop, shutter, ISO and flash power are all varying depending on the scene, subject, background, distance, camera/brand, lens, flash setup, etc. and MANY other external conditions. For example, F-stop on Nikon systems show the effective F-stop, while Canon systems show the F-stop set on the lens regardless of magnification. Even if I shared the settings for any particular shot, it will probably not work for you as it is tweaked precisely for every scene and equipment setup.
Some important factors absent from EXIF must be considered. Without knowledge of these, the EXIF alone is not useful.
- Available light (torch, sunlight, etc)
- Distance from lens to subject
- Distance from flash to subject
- Distance from flash to diffuser and diffuser to subject
- Presence of surfaces to reflect light onto subject
- Length of extension tubes if any
- Diopter of any close up filters
- Any blockage of flash/diffuser (e.g. leaves)
- Brand/model and age of camera/lens/flash
- Number of flashes
- Diffuser efficacy
- Position and angle of flashes
- Strength of flash batteries
As of mid-2021, I have included EXIF in my photos on Flickr. Although EXIF alone is not very useful, it does provide some information that could be a reference to others.
Macro Equipment History
I change my setup very frequently. Here’s a history of some of my basic setup changes. There were many changes in the lighting system and accessories in between but they are not listed here.
| Period | Setup | Remarks |
| 2022 – Current |
Simplified Setup
Wide-Angle CCTV Add-OnAdded on to above setup with micro-adjustments for wide-angle fisheye close-ups.
Additional Flash Rig for Large Subjects |
Added an entry-level M4/3 system for lightweight high magnification shots as the DOF is deeper, while compromising on image resolution. Useful when not possible to stack. |
| Jan 2021 – 2022 |
Normal Handheld Setup
Fisheye Relay Wide Angle Setup
High Magnification Lightweight Setup
|
Added an entry-level M4/3 system for lightweight high magnification shots as the DOF is deeper, while compromising on image resolution. Useful when not possible to stack. |
| May 2018 – Dec 2020 |
Handheld Setup
Tripod Setup
Rectilinear Wide Angle SetupFisheye Relay Wide Angle Setup
|
Changed to Meike MK-MT24 for my flash system as they utilise RF signals which are much more reliable, and AAA batteries which are readily available. Read the review here. |
| Jan 2017 – May 2018 |
Handheld Setup
Note: I removed my extension tubes and switched to Raynox DCR-150 for greater flexibility in composition for a greater variety of subjects while sacrificing magnification. Handheld Setup (Mirrorless)
Read also: Olympus STF-8 Macro Twin Flash Review Tripod Setup
Wide Angle Setup
Wide Angle Setup (Mirrorless)
Read also: A Lightweight Set-Up for Wide Angle Macro to Attain More Depth of Field |
Slightly heavier, but greater flexibility and faster recycle time. |
| Jan 2015 – Dec 2016 |
Handheld Setup |
Excellent results but light power can be insufficient at times. |
| Mar 2013 – Dec 2014 |
Handheld Setup
|
Excellent results but very heavy to hold with 1 hand. |
| Jul 2012 – Feb 2013 |
Handheld Setup
|
Great light setup! Only downside is that it is not ideal for covering shadows, as compared to dual flash systems. The LED focusing lights also tend to produce multiple hot spots on reflective surfaces. |
| Jul 2012 |
Handheld Setup
|
Very light setup, but flash power may not be sufficient at times, and working distance can be too close for comfort. |
| Apr 2012 – Jul 2012 |
Tripod Setup
|
Extremely heavy setup but with the most flexible lighting options. |
| Mar 2009 – Mar 2012 |
Tripod Setup |
Very heavy and flexible, but still possible to shoot handheld at times. Longer focal length means much smoother bokeh too! |
| May 2008 – February 2009 |
Tripod Setup
|
Light-weight setup with limited lighting options. |
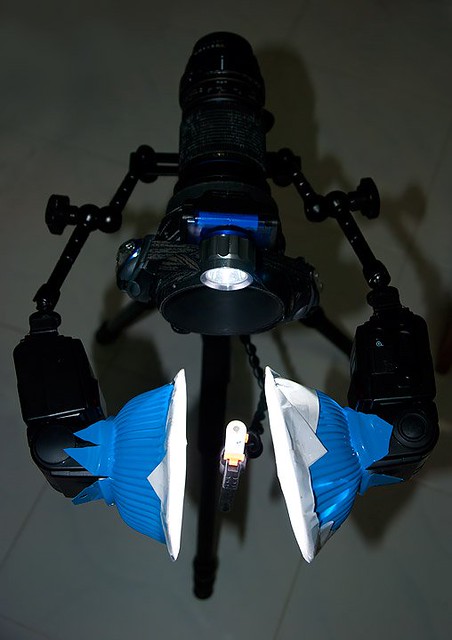
Hamburger lighting
Here’s a visual on how my old setup looks like, with the battery as subject. Of course, the camera body was missing — I was using it to shoot this picture and trigger the flashes! 😛
Higher magnification
With the Raynox DCR-250 attached, I could go for higher magnifications and manage the entire monstrous load hand held.
Articulating arms
My set up got heavier over time….
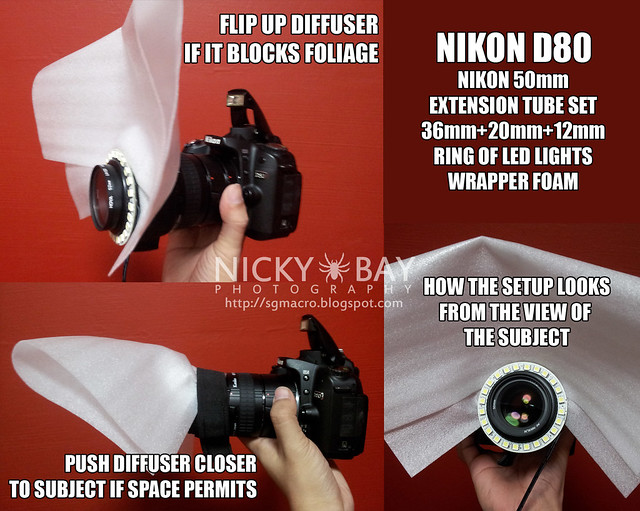
LED ring focusing light
And one of my latest contraptions… a ring of LED lights for focusing! Lasts for 10 hours without heating up so I usually leave them on for the whole day. The wires were bare and fragile however, so I had to resolder the connections every now and then. It is super lightweight, but the raw LEDs are not diffused and tend to appear on the subject.
Light-weight setup
Occasionally, I might opt for a lighter setup, using a 50mm with extension tubes, or Tamron 90mm and optionally with Raynox DCR250. Both work well with the onboard flash diffused by a flimsy foam wrap.
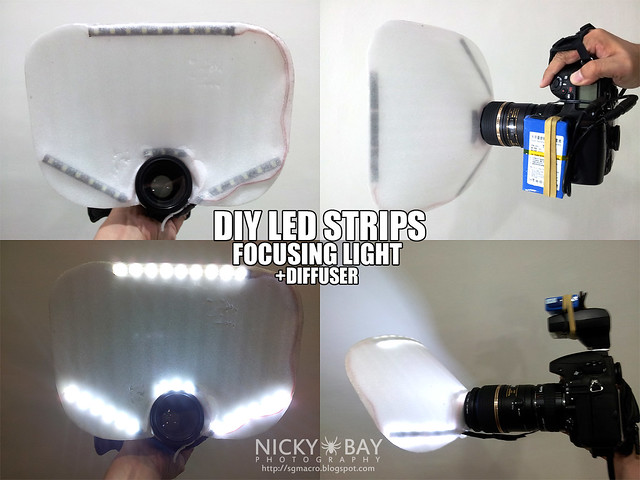
LEDs embedded into diffuser
I played around with the diffusers, and embedded LED lights into the diffuser for a light-weight focusing light! The LED’s battery was tied on top of the SB400.
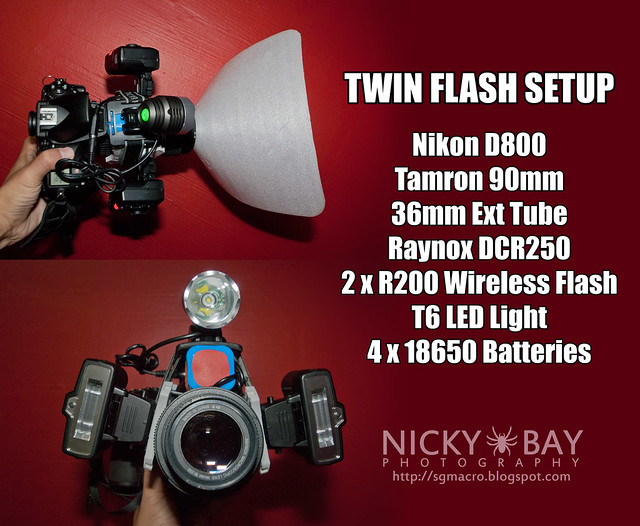
Wireless flashes
An example of how I rigged the SB-R200 onto the lens as I did not like the default ring mount provided in the Nikon R1/R1C1. I’ve also added a more powerful focusing light. Unfortunately it was so powerful that the beam appears on reflective surfaces as well, even with full flash. This setup is relatively light for a twin flash as no arms nor cables are required for the flashes.
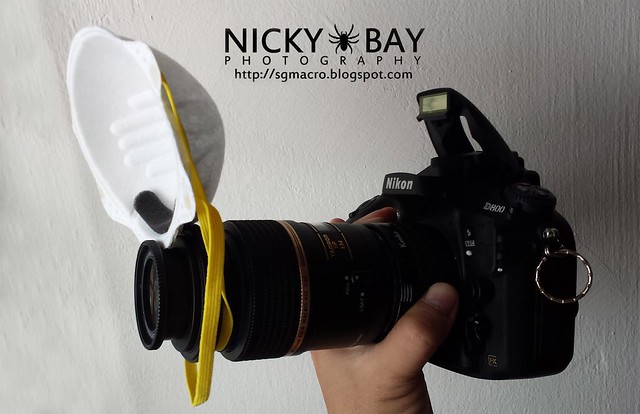
Mask diffuser
Non-stop innovation is key to a good lighting system. Here’s an attempt to use the N95 mask as a flash diffuser during the June 2013 haze.
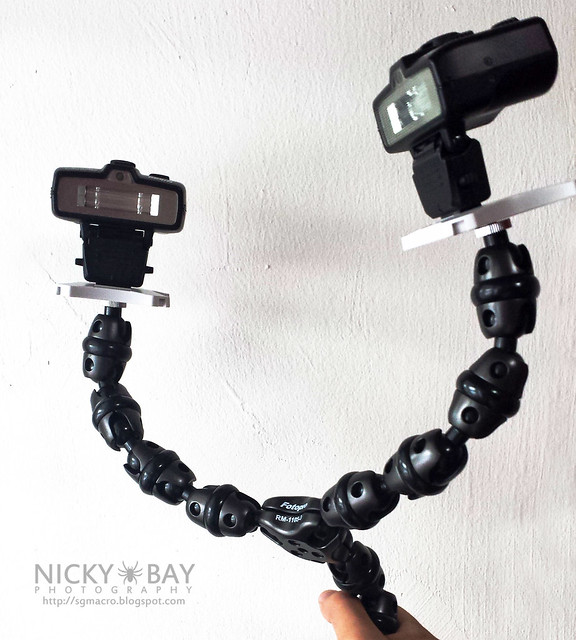
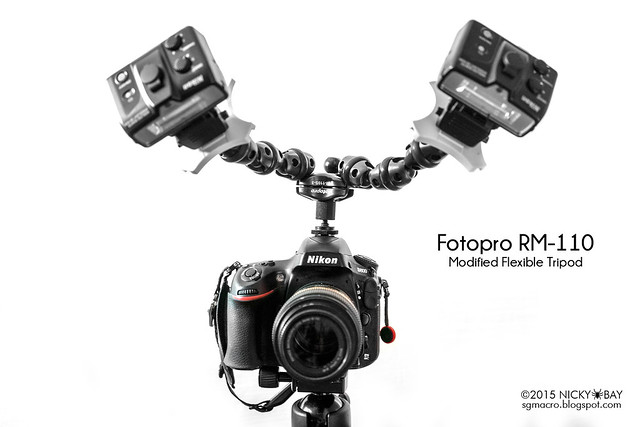
Flash arms using tripod legs idea
Finally, a recent idea for lighter weight flash arms using FotoPro’s Spider Tripod. Commonly known as the Gorillapod by Joby, this product lets you take the joints and arms apart. I could change the screws to make a lighter dual flash arm and remove the last leg.
Flash arms using tripod legs
Here’s how the setup could look like on the camera. Extremely light-weight but additional work would be required to ensure the stability of the flash arms.
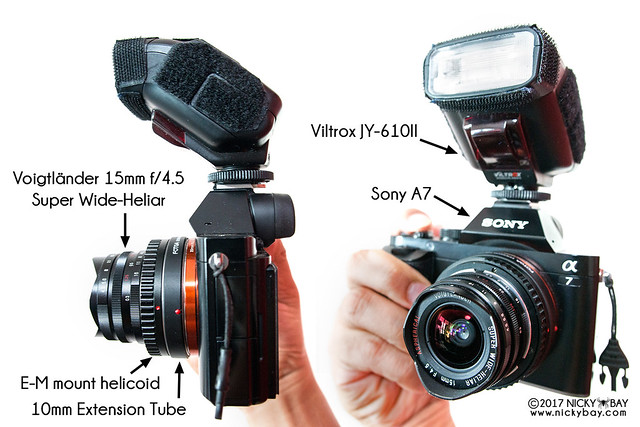
Lightweight Mirrorless Wide Angle Macro
For a period of time, I experimented with a lightweight wide angle setup using the Sony A7 and published it here.
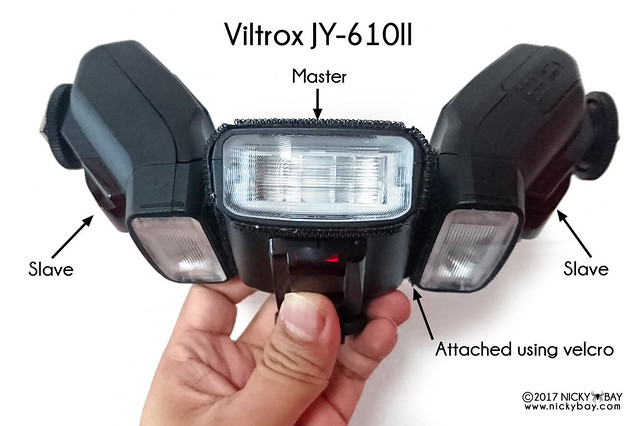
Attaching Multiple Flashes
Simple way to increase the flash power or have a faster recycling time — just use velcro!
Micro Four-Thirds (M4/3) Setup
I put together a M4/3 setup, and published the results here.


Rosa Tuiran
Hi,
My name is Rosa Tuiran and I am a Producer for a YouTube wildlife video series called Deep Look, where we focus on tiny animals, plants and fungi and we use macro photography. I am trying to do a story about terrestrial isopods and their maternal care. I see you’ve photographed isopods extensively and have some expertise in this. I was wondering if you have time for a quick call?
I am currently in San Francisco.
Looking forward to hearing back from you.
Best,
Rosa